
Light Painting Photography- An Introduction
An Introduction to light painting

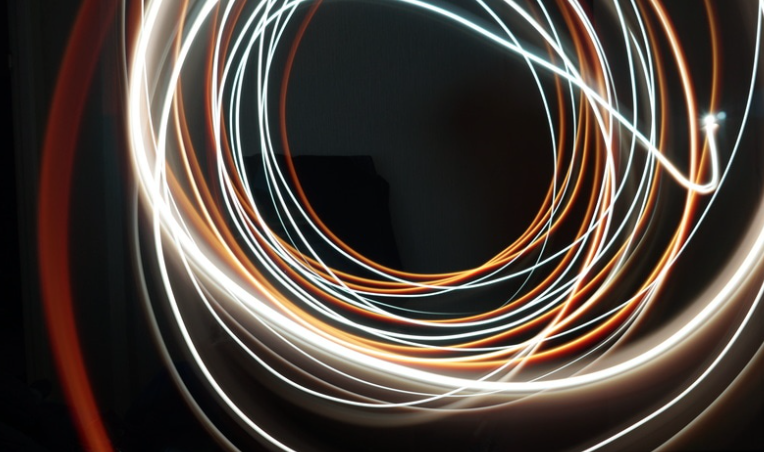
Let’s start the new year with a new photography technique; light painting photography. Light painting or light drawing is a photographic style where a photographer introduces a variety of light elements during a single long exposure in a dark environment. Any piece of equipment that emits light can be introduced over the course of the exposure. To achieve this technique you must have a camera that has the ability for longer shutter speeds.
Fun photography fact: This technique actually dates back to 1889 when two photographers, Frank Gilbreth and his wife Lillian, used small lights and the open shutter of a camera to track movement. However, the first art photographer who was known for this method was Man Ray in his 1935 Space Writing series.
Let’s move away from the facts and get down to business. Here at Parrot Print we’ve put together some tips on how to do light painting photography to create unique and striking canvas prints.
Let’s Get Manual
If you’ve got a bad habit of depending on your camera’s automatic settings, then this is the ideal opportunity to switch it to manual and learn some new aspects while having fun. If you did read your camera’s manual, don’t worry it’s not a requirement, then you’ll understand all the functions to create long exposure photographs. However, if you didn’t that doesn’t matter, it’s all about experimenting until you create the images you desire.
You may not be use to capturing photos in the dark, so before you set your camera up check out these low lighting photography tips. Now, that you’ve learnt the tricks of the trade, it’s time to get your hand on a DSLR camera, which is preferred for this style of photography and has the following features:
Shutter Speed- between 11 to 30 seconds for a longer exposure
Aperture - between f/8 and f/32
ISO - 100 or 200
Remember with a digital camera you’re able to view your images straight away, so you can adjust your settings to suit the results you want to achieve. Make sure you shoot in RAW, as these are easier to edit.
Understand Your Technology
Although you probably all know the different features on your camera and the technical terms to match, we thought we’d just run through them to make sure everything it clear. The ISO feature measures how sensitive the capture array is to light. The higher the ISO, the more sensitive it is to light. We suggested you should use a camera with an ISO of 100/200 because this is ideal if you’re using studio lights.
An aperture is an opening through which the light travels. This is extremely important for this style of photography. You have to get the balance right between your aperture and the shutter speed, as they go together. If one increases you have to make sure the other decreases, otherwise you’ll fail to expose the picture.
Choose Your Light Source
When it comes to choosing your light source try and think outside the box. So, rather than reaching for a torch, opt for the light on your smartphone, a coloured glow stick, laser pens, LEDs, sparklers and fireworks. Literally anything that gives off light can be used to create a light photography canvas print.
You may need to secure your light source to ensure it stays in place. If you do, check out these tips on how to create light props with items you already own. You’ll find these simple methods are ideal for reflecting light in one direction.
Don’t Forget Your Tripod
To capture long exposure images your camera must be extremely still. The only solution that eliminates any shaking is a tripod. Your camera needs to be able to focus on your light source and unfortunately our hands naturally shake. Using a tripod will not only help with those difficult angles, but will help achieve the unique style this technique showcases. Now, if you don’t have access or the funds for a professional tripod, you can always use items within your home as props. A chair or a table will serve as a temporary measure or if you have any other items within your home that boast a flat surface, they’ll do the trick.
Get Painting!
Follow these simple steps and get started:
1) Mount your camera onto your tripod
2) Switch it to manual set-up mode
3) Set-up the aperture. Wider aperture for brighter background and a narrow aperture for dimmer background
4) Set-up the shutter speed. We suggest you put it on the lowest
5) ISO should also be on the lowest otherwise your light will be too bright, and that will ruin what you’re trying to create
3) Set-up the timer
4) Turn on your choice of lighting and start painting
Have you tried creating light painting photography before? Don’t forget to share your images with us on Facebook or Twitter – we’d love to see!